
Comprehensive Live Event Set Up using ReStream
This is a comprehensive, step-by-step checklist for you to follow to live stream events into your app. This checklist will be useful for anyone on your team to correctly set up this event to show on your app and other social platforms supported by ReStream if they follow these steps exactly!
Don't forget to test your live stream setup before the event, but note that you will need to create a Test Event when using YouTube because YouTube will use your event and not give it back! It is best practice to be sure you have correctly completed all steps and can see a stream in the app and all other socials, then you can trust your set up for your live event.
Live Event Set Up - Streaming Applications
This section will describe how to set up the streaming applications of ReStream and YouTube for live streaming events into your app and other social platforms supported by ReStream.
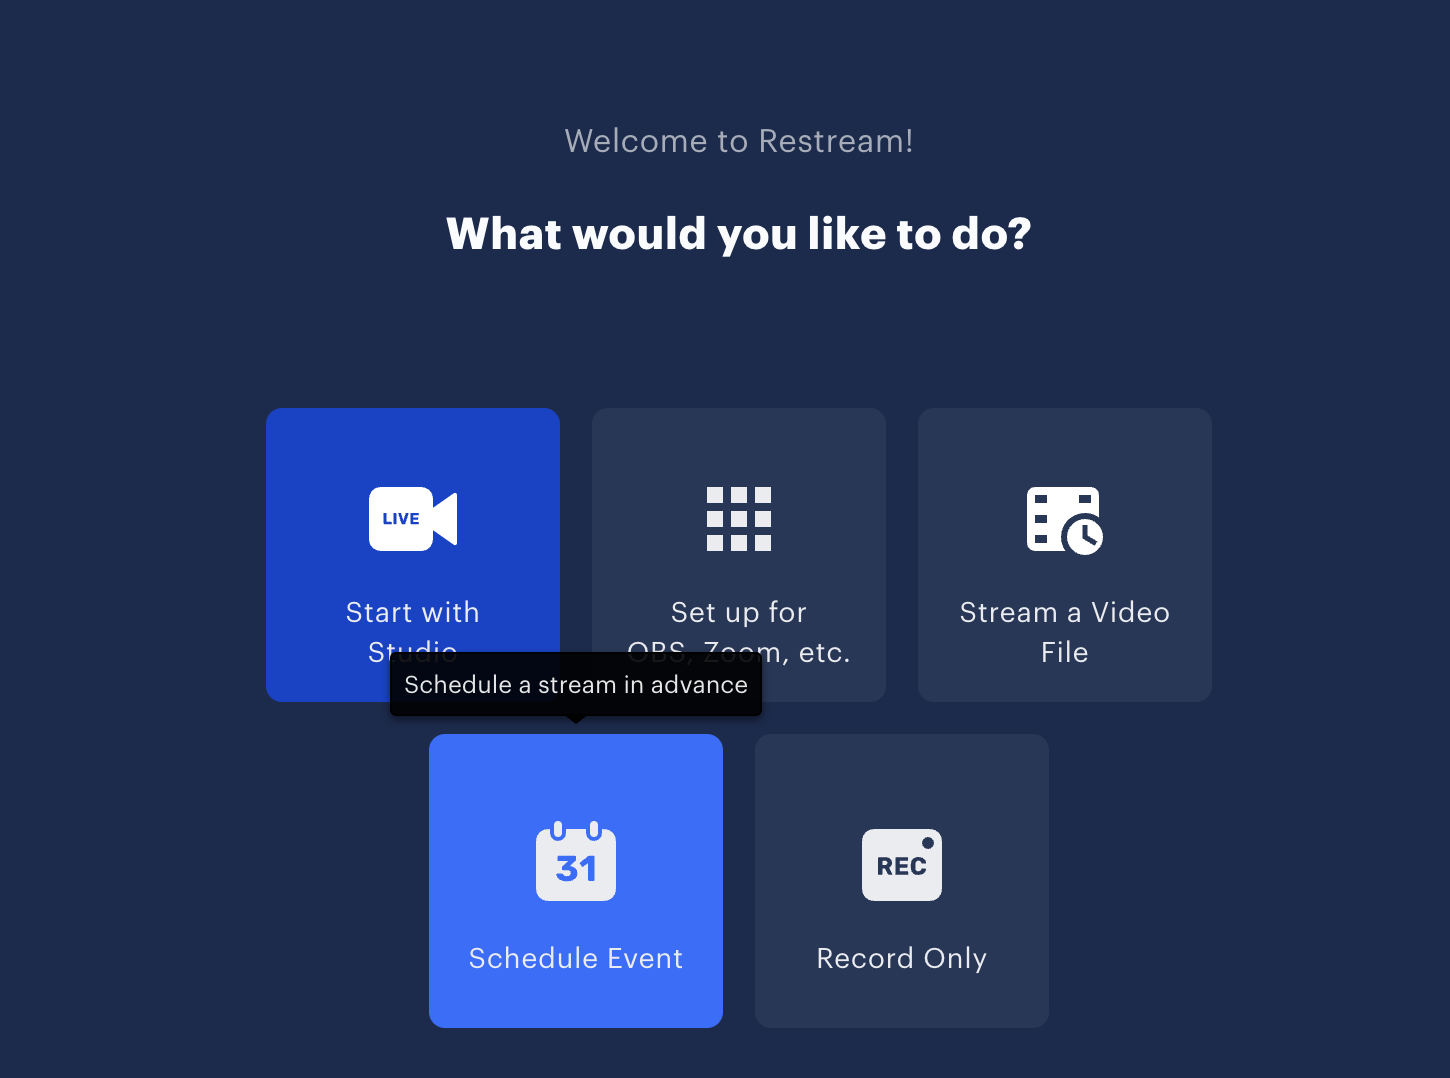
First, create your ReStream event ( https://app.restream.io )
Select Schedule Event
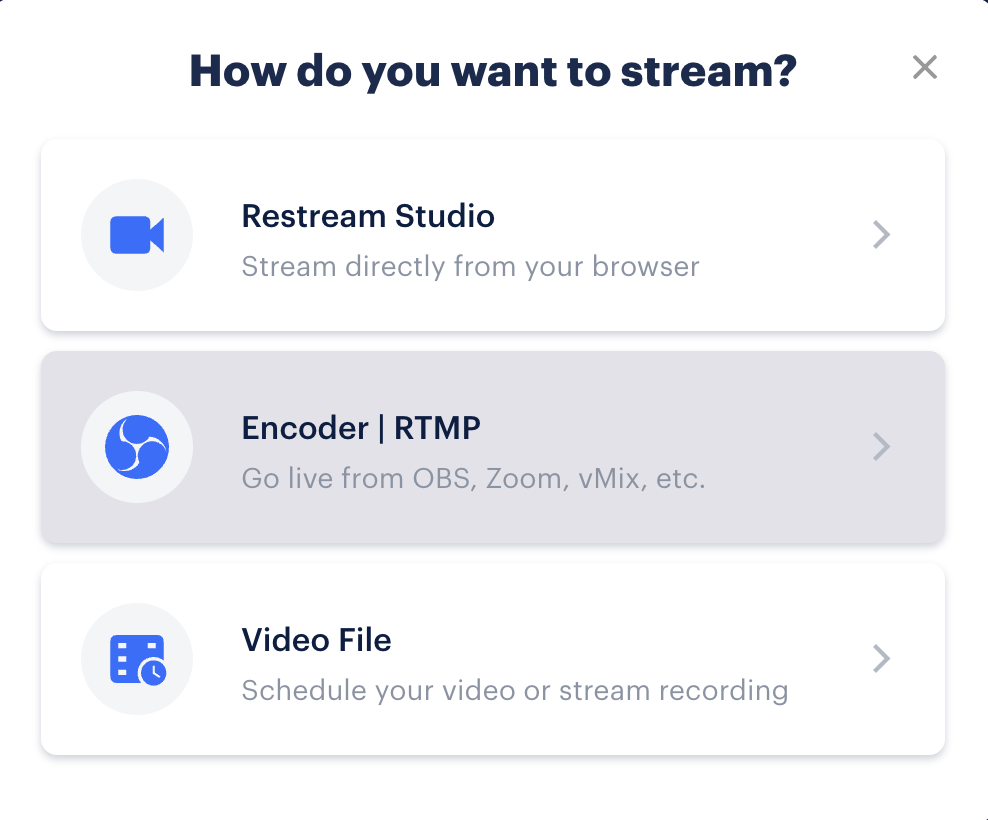
Select Encoder | RTMP
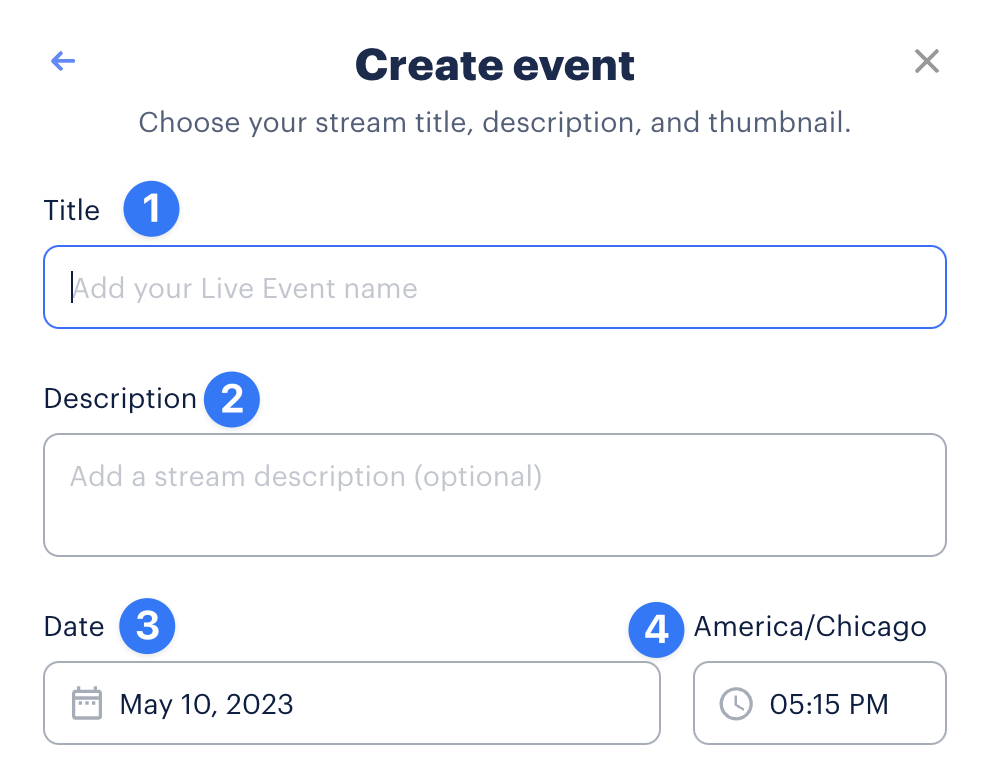
Add your title
Add your description
Set the date
Set the time (will be based on your timezone)
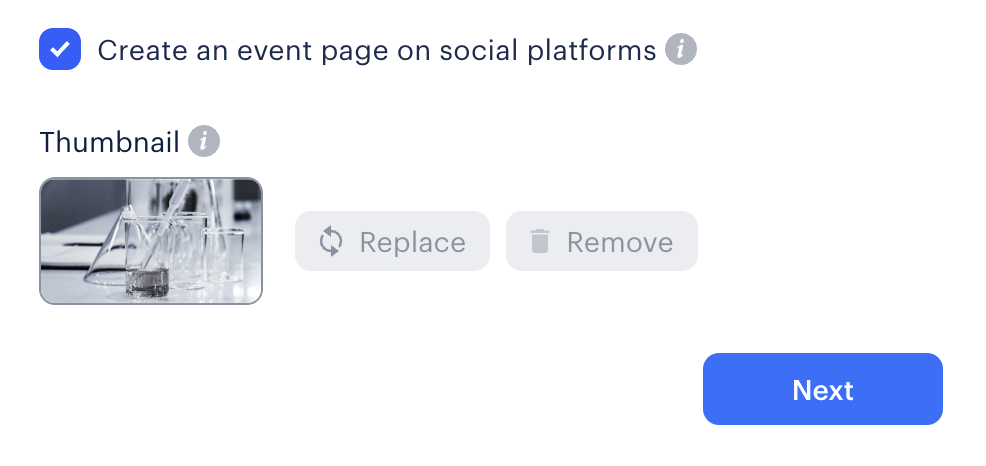
Enable “Create an event page on social platforms”
Upload featured graphic to ReStream thumbnail and click “Next” - By adding this here you will not need to add your image to YouTube or Facebook (if used)
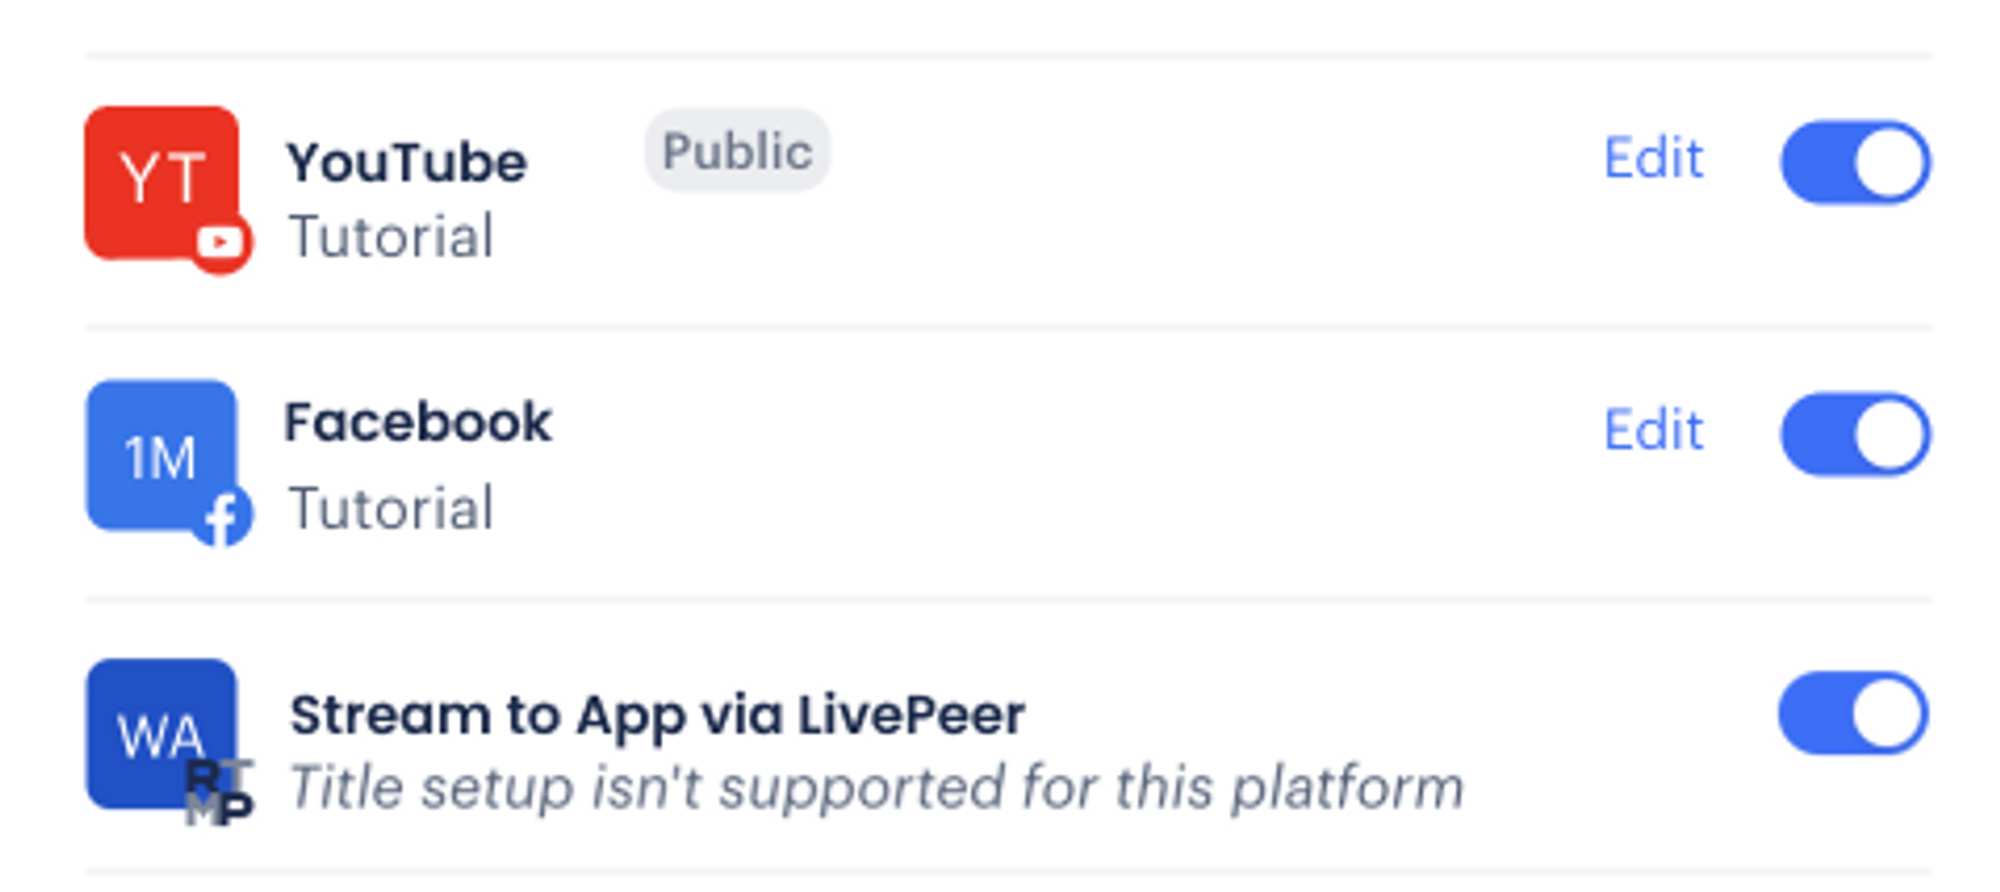
Enable all social platforms you want to stream your event to, ReStream will set up the event on the enabled pages based on the selection to create event page
Click “Create Event”

Edit YouTube Event Created from ReStream
Go to the YouTube Studio dashboard

Select the event you want to update by clicking on the title
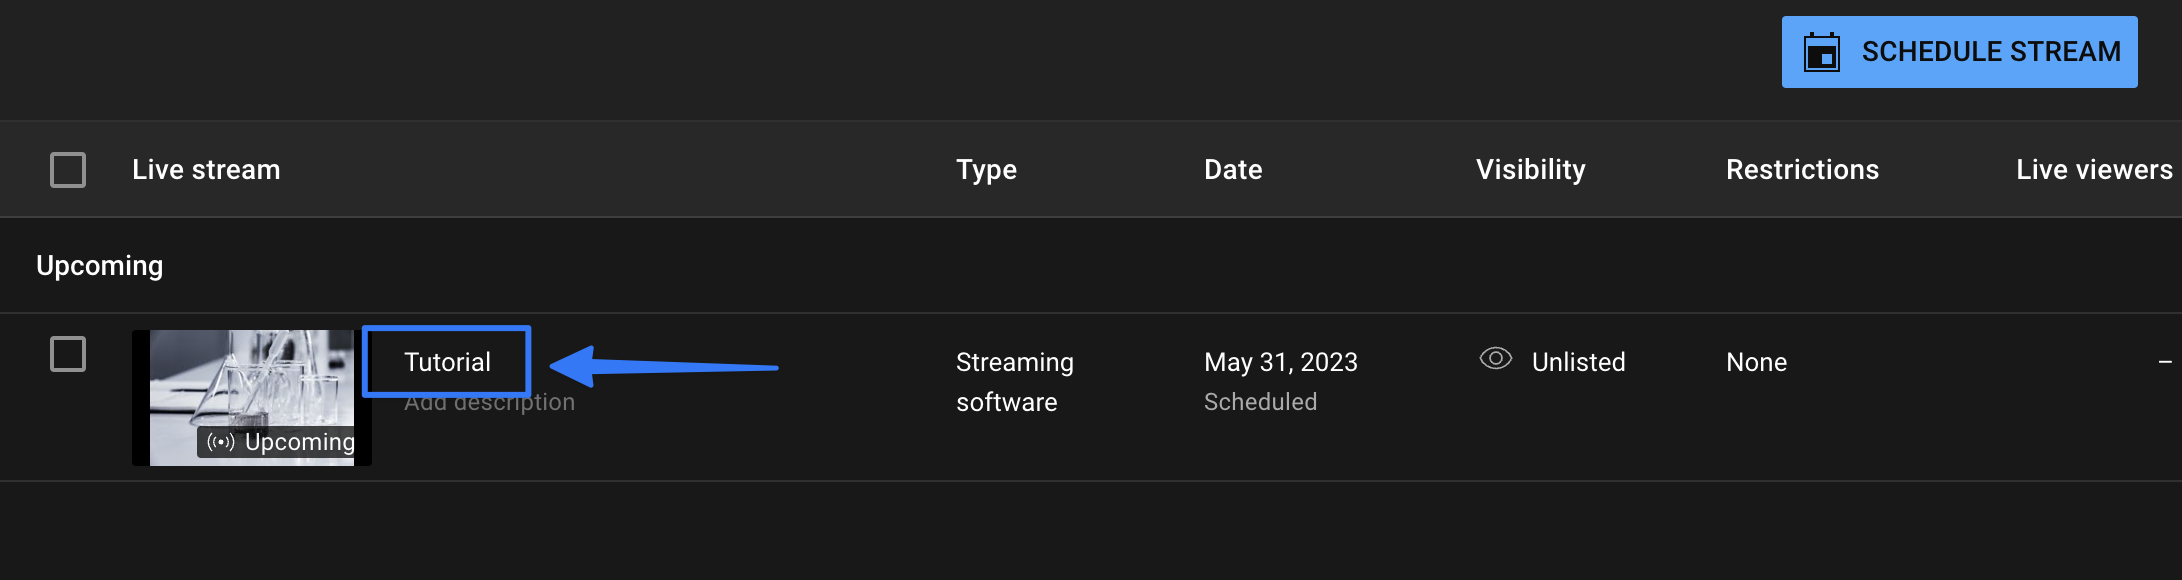
Click on the "Edit" button
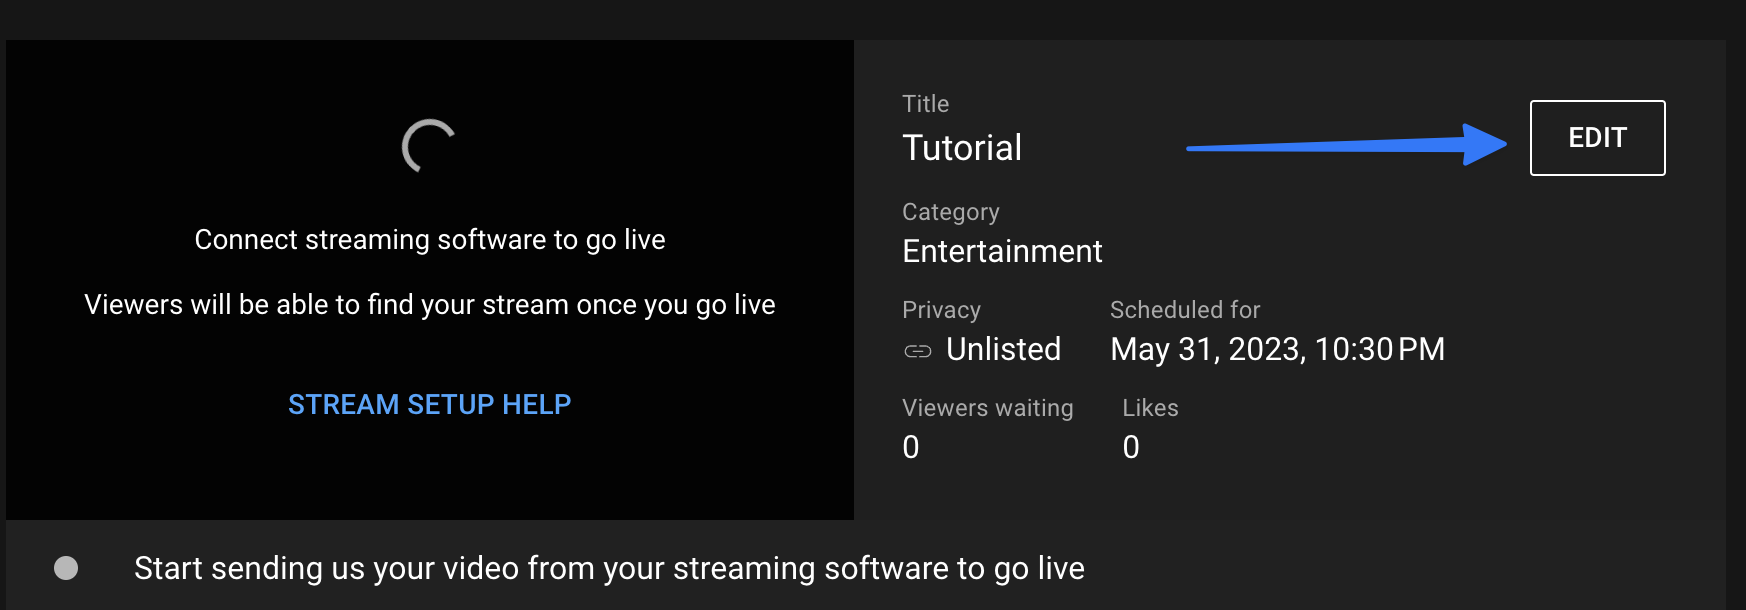
In the "Details" tab, update the event details as needed (title, description, date/time, visibility, etc.) Note that all this has been added by ReStream already
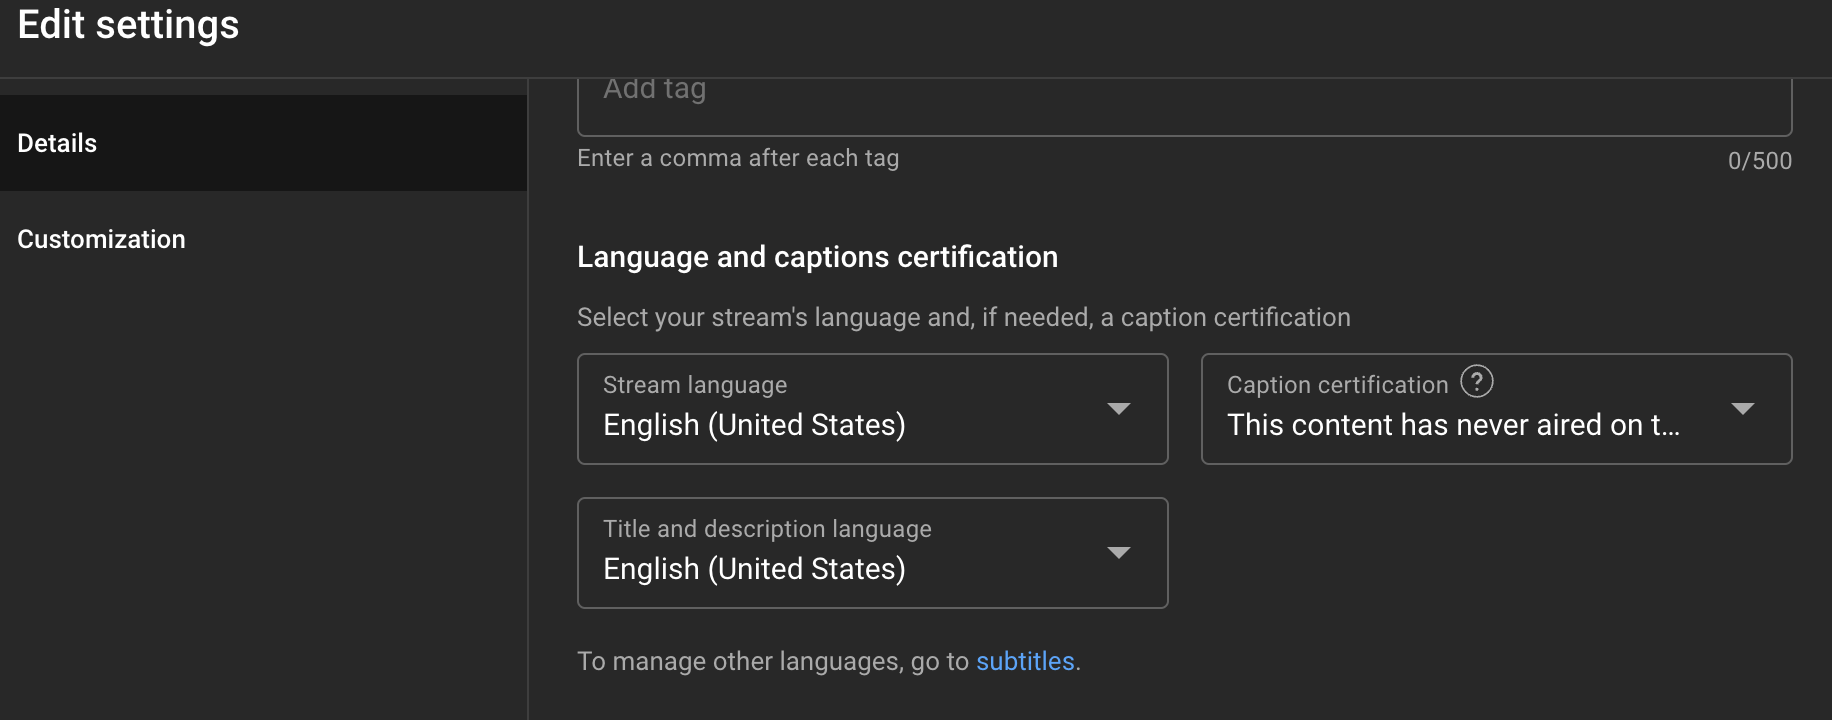
Scroll down to “Language and captions certification” and choose the appropriate language and certification for your captions
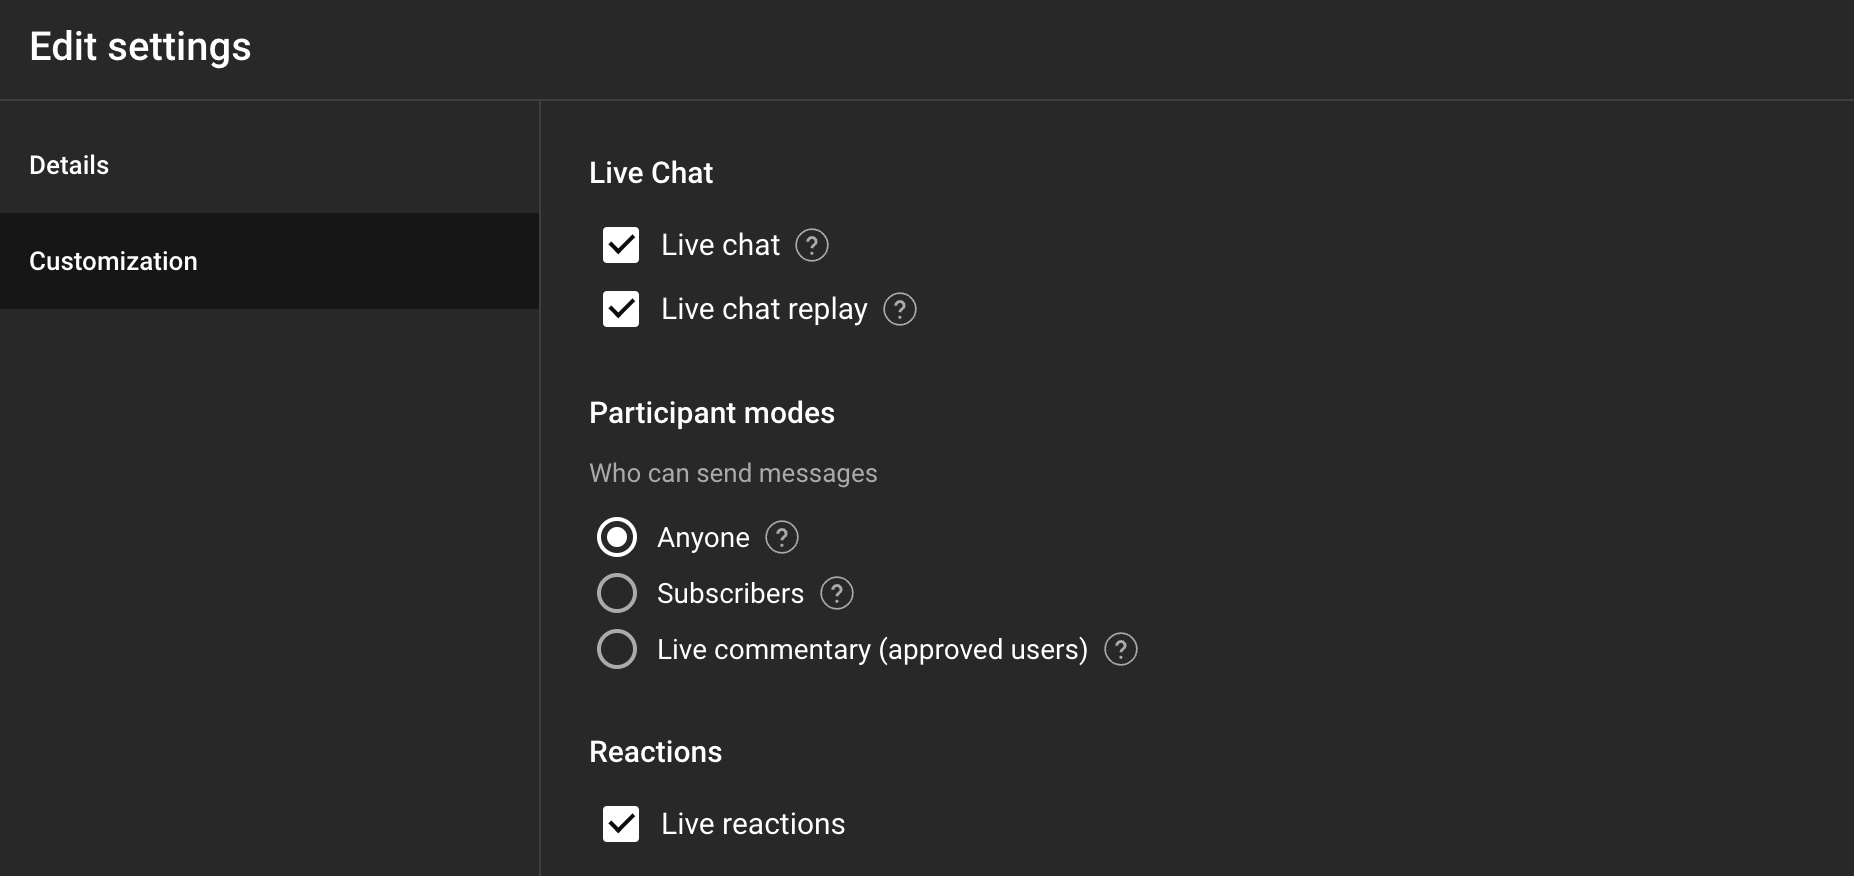
Under “Customization” tab set the audience participation settings the way you want and click “Save” to exit the editor. Note that the YouTube chat from the event will not appear in the replays without the “Live chat replay” being selected.
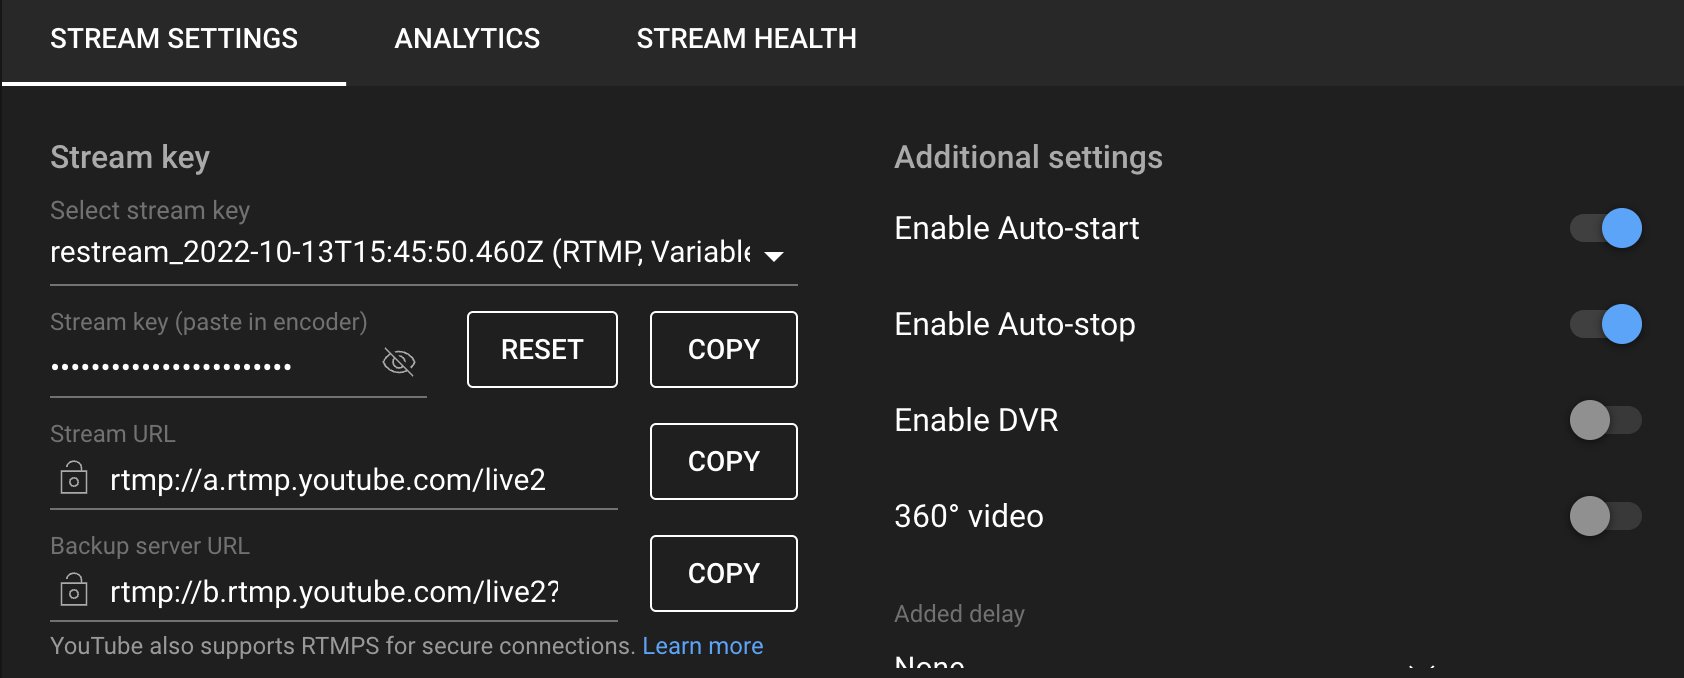
Below the Stream Preview Screen set the “Steam Settings” - suggested practice is to enable auto-start and stop, and disable the DVR.
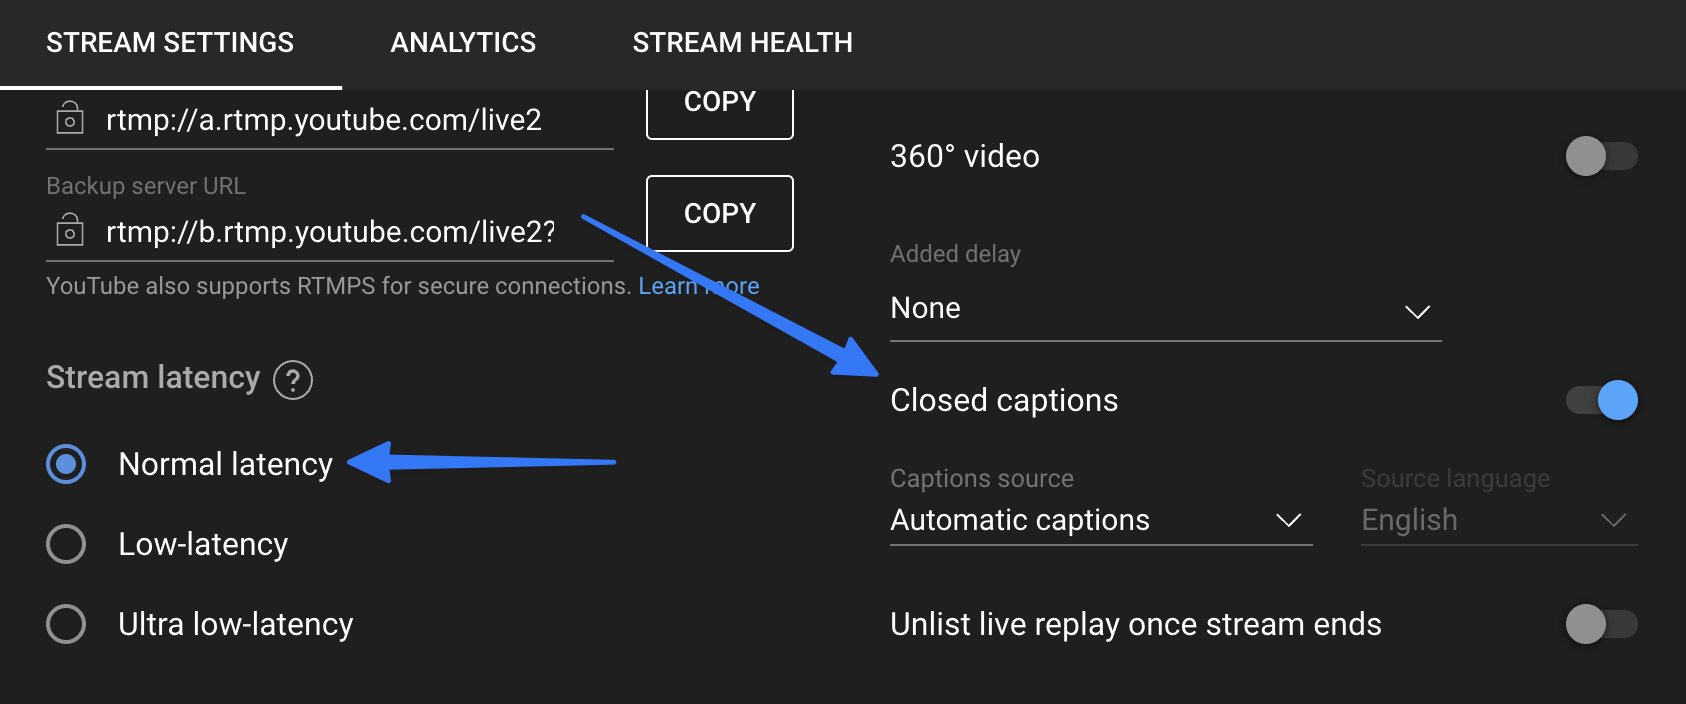
Scroll down in “Stream Settings” to turn on captions and set stream to “Normal Latency”
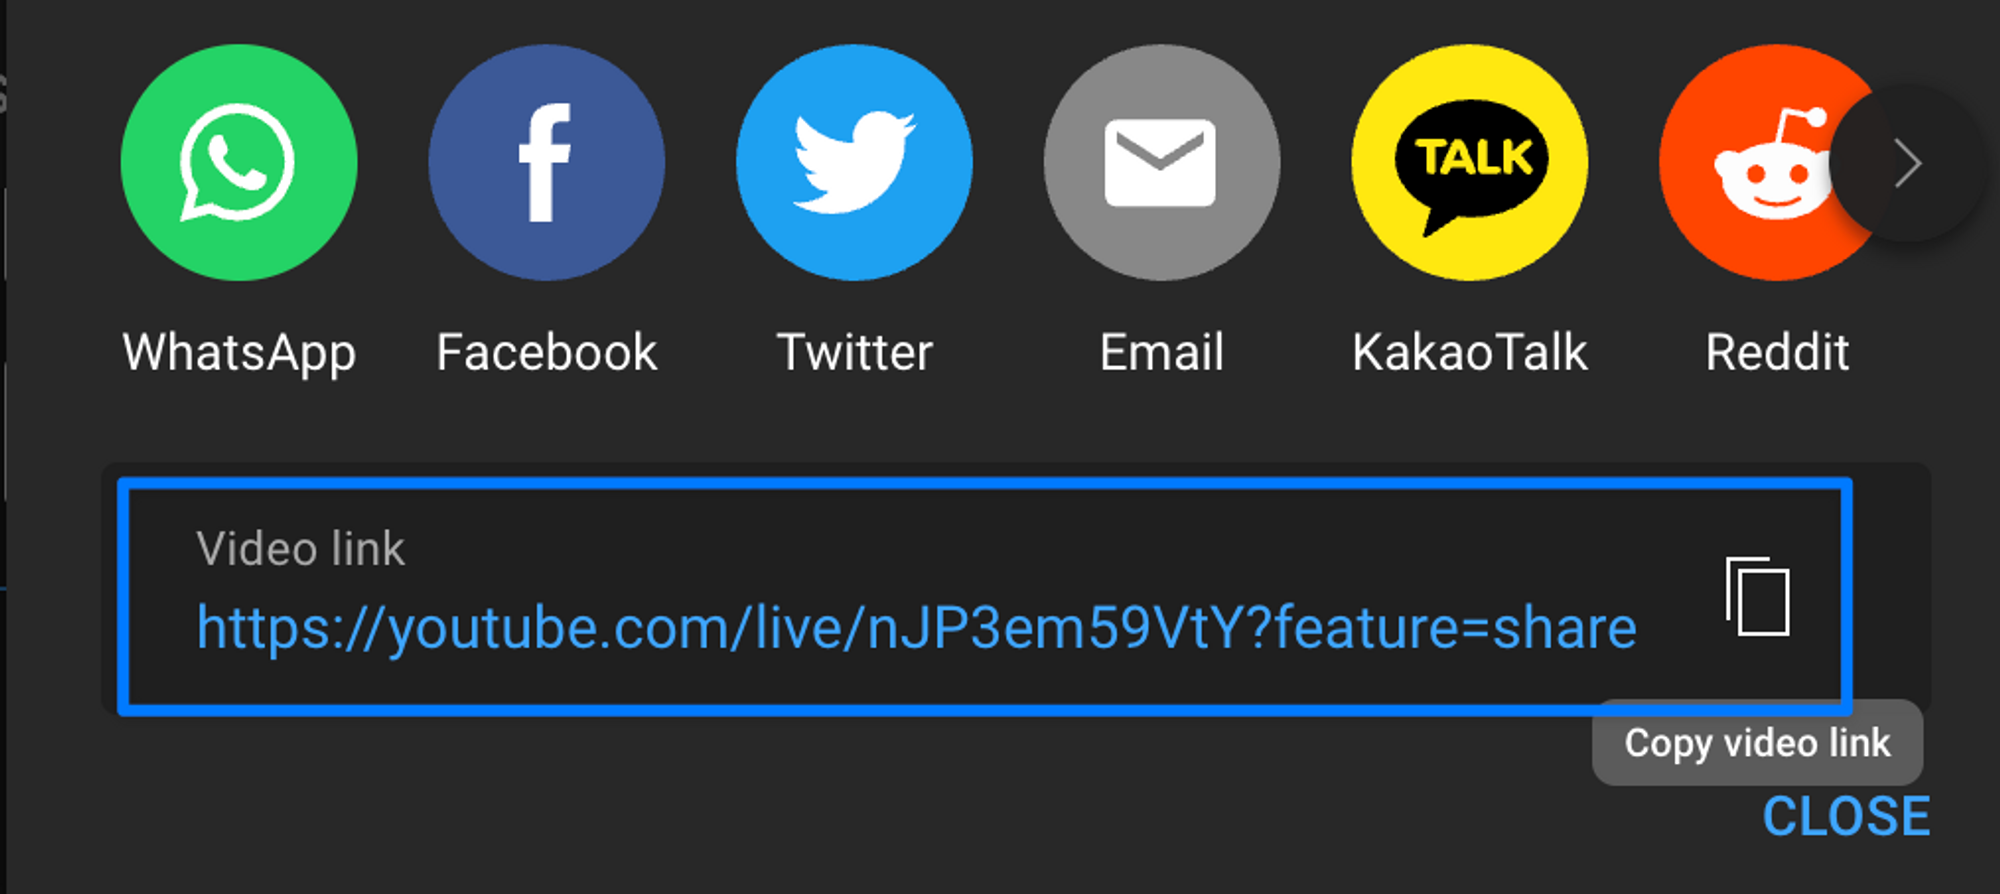
Back at the top of the YouTube Studio page, click on the share arrow

From the Share Box copy the Video Link, paste it to a Note, Google Doc, or Word Document to edit it to https://youtube.com/embed/[sharecode] → This link is what you will add to the Tribe Social Dashboard in a later step
[Share Code] is nJP3dm59VtY for this video, that is the only part you need to paste after the embed/ you will see right above
Dashboard Pre-Event Set Up - Web
Please note that the next section of the Live Event Checklist requires an ADMIN account in the Tribe Social Dashboard to complete. It is important to ensure that only an authorized user with admin privileges carries out this task. Admin accounts have access to sensitive information and can perform critical actions that impact the entire platform. Therefore, it is essential to ensure that the admin account follows the correct steps to create a collection, add content, and create ads. These steps are crucial to ensure that the live event runs smoothly and that users are directed to the right content. So, please make sure that you have the necessary permissions before proceeding with the next section.
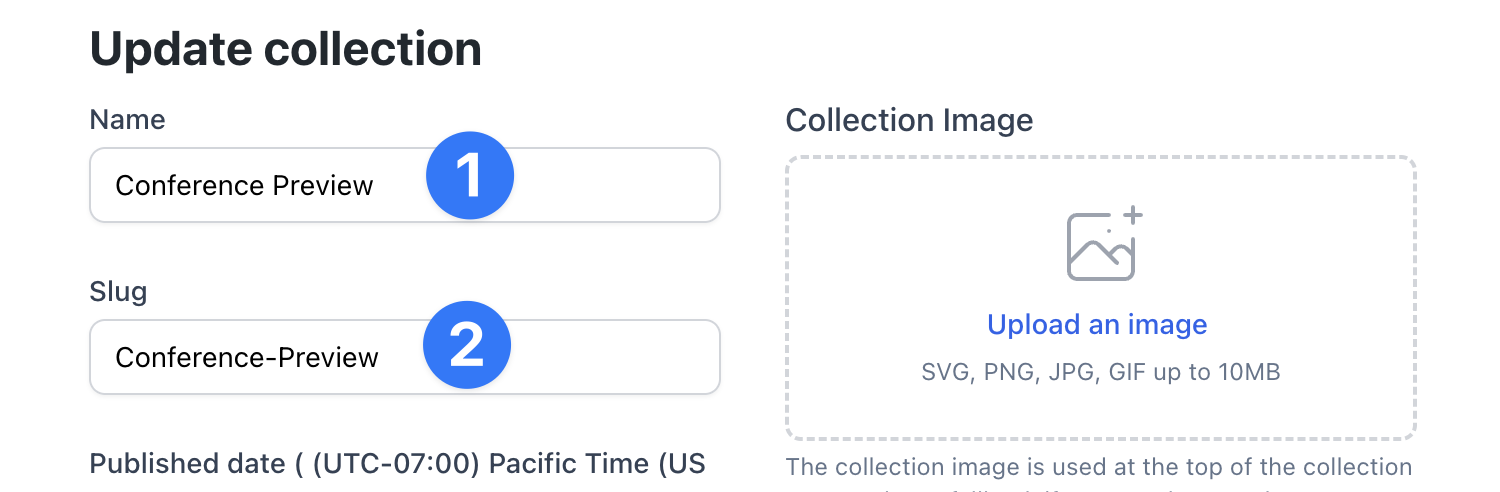
Create Collection
Add title (Name)
Confirm Slug - best to keep it short + relevant (you will need this later!)
Add/Change author
Check Show on home page

Choose a position number. This should be relative to where you want it to appear on the homepage. In this case, we wanted it at the top and had other collections to bring it above.

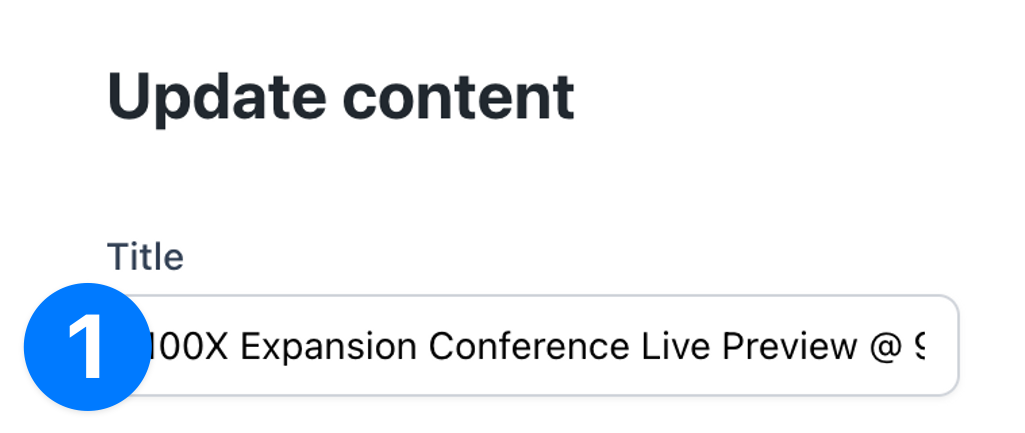
Create Content
Add title
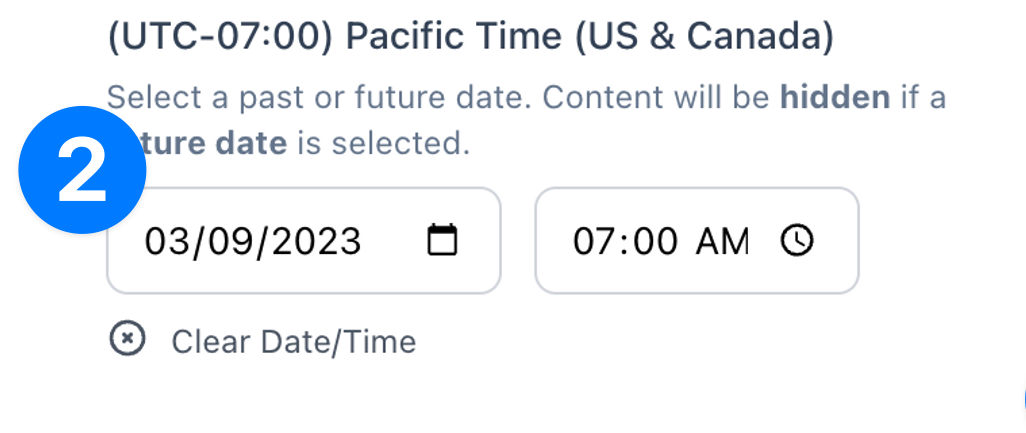
Set publish date + time
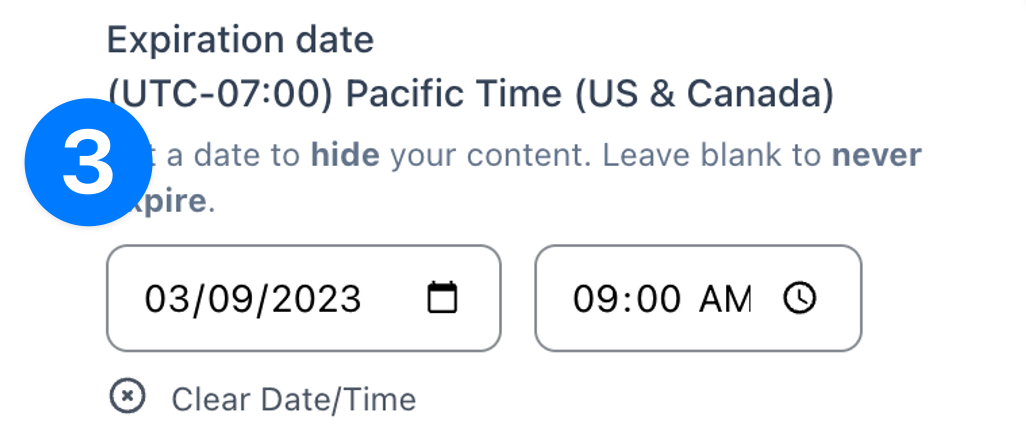
Set end date + time
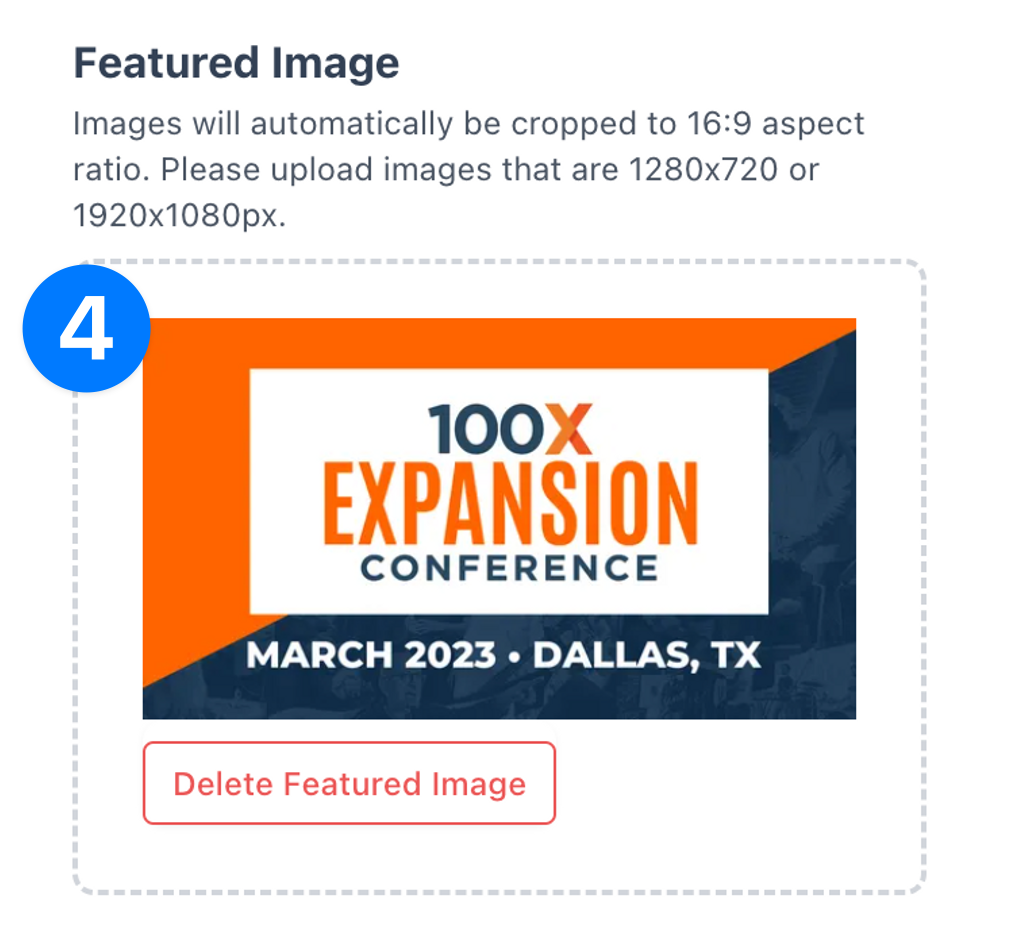
Add featured image
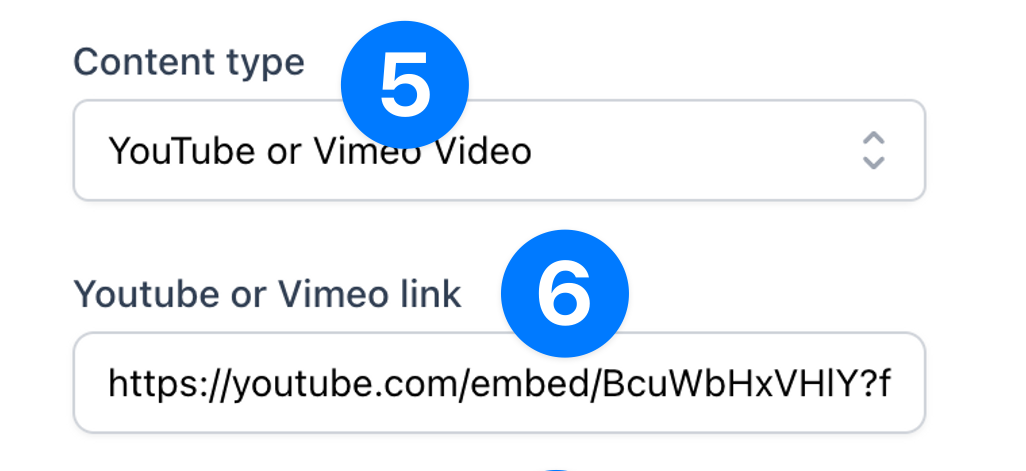
Select Content Type
Paste the YouTube link you created here
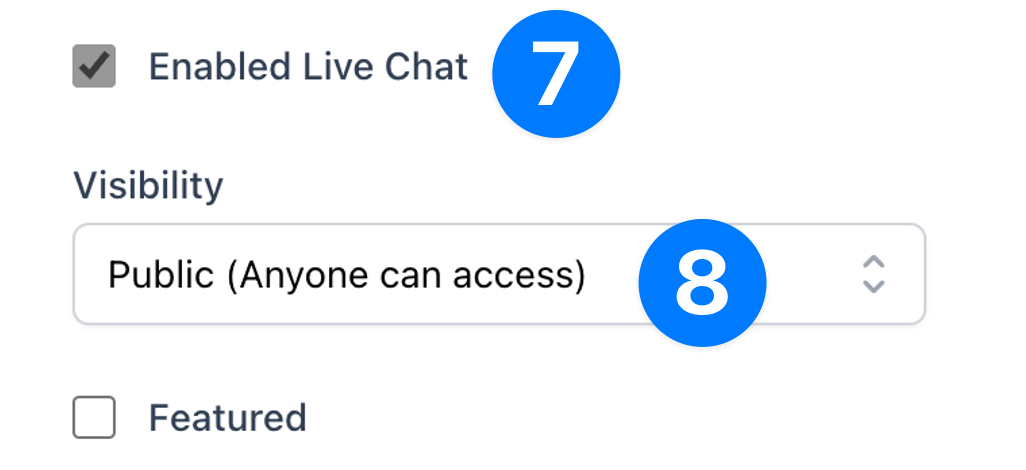
Click enable live chat
Set visibility to public
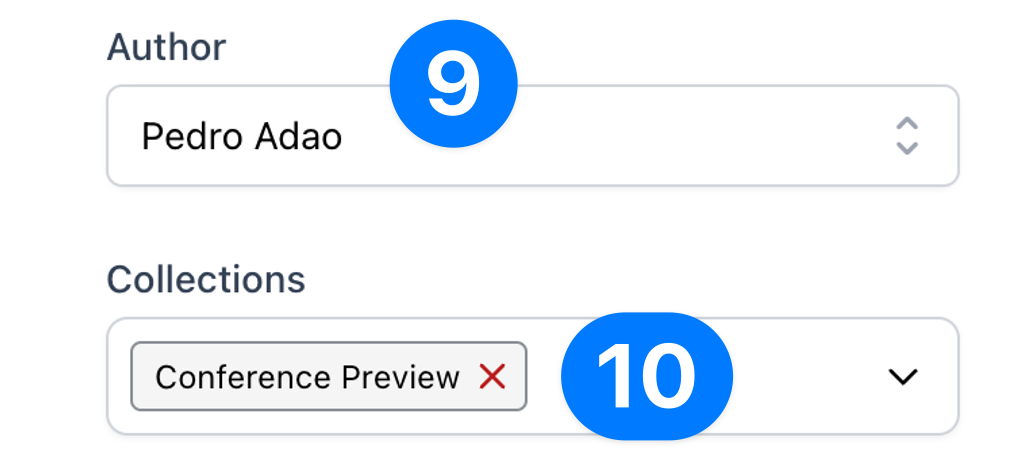
Add/change author
Add to the collection you set up in the previous step
Following those two steps (Collection + Content Creation) you will have created the public web share link like this: https://100x.wisdom.ly/Conference-Preview/3380
Note that the “Conference Preview” is the collection name you set up!
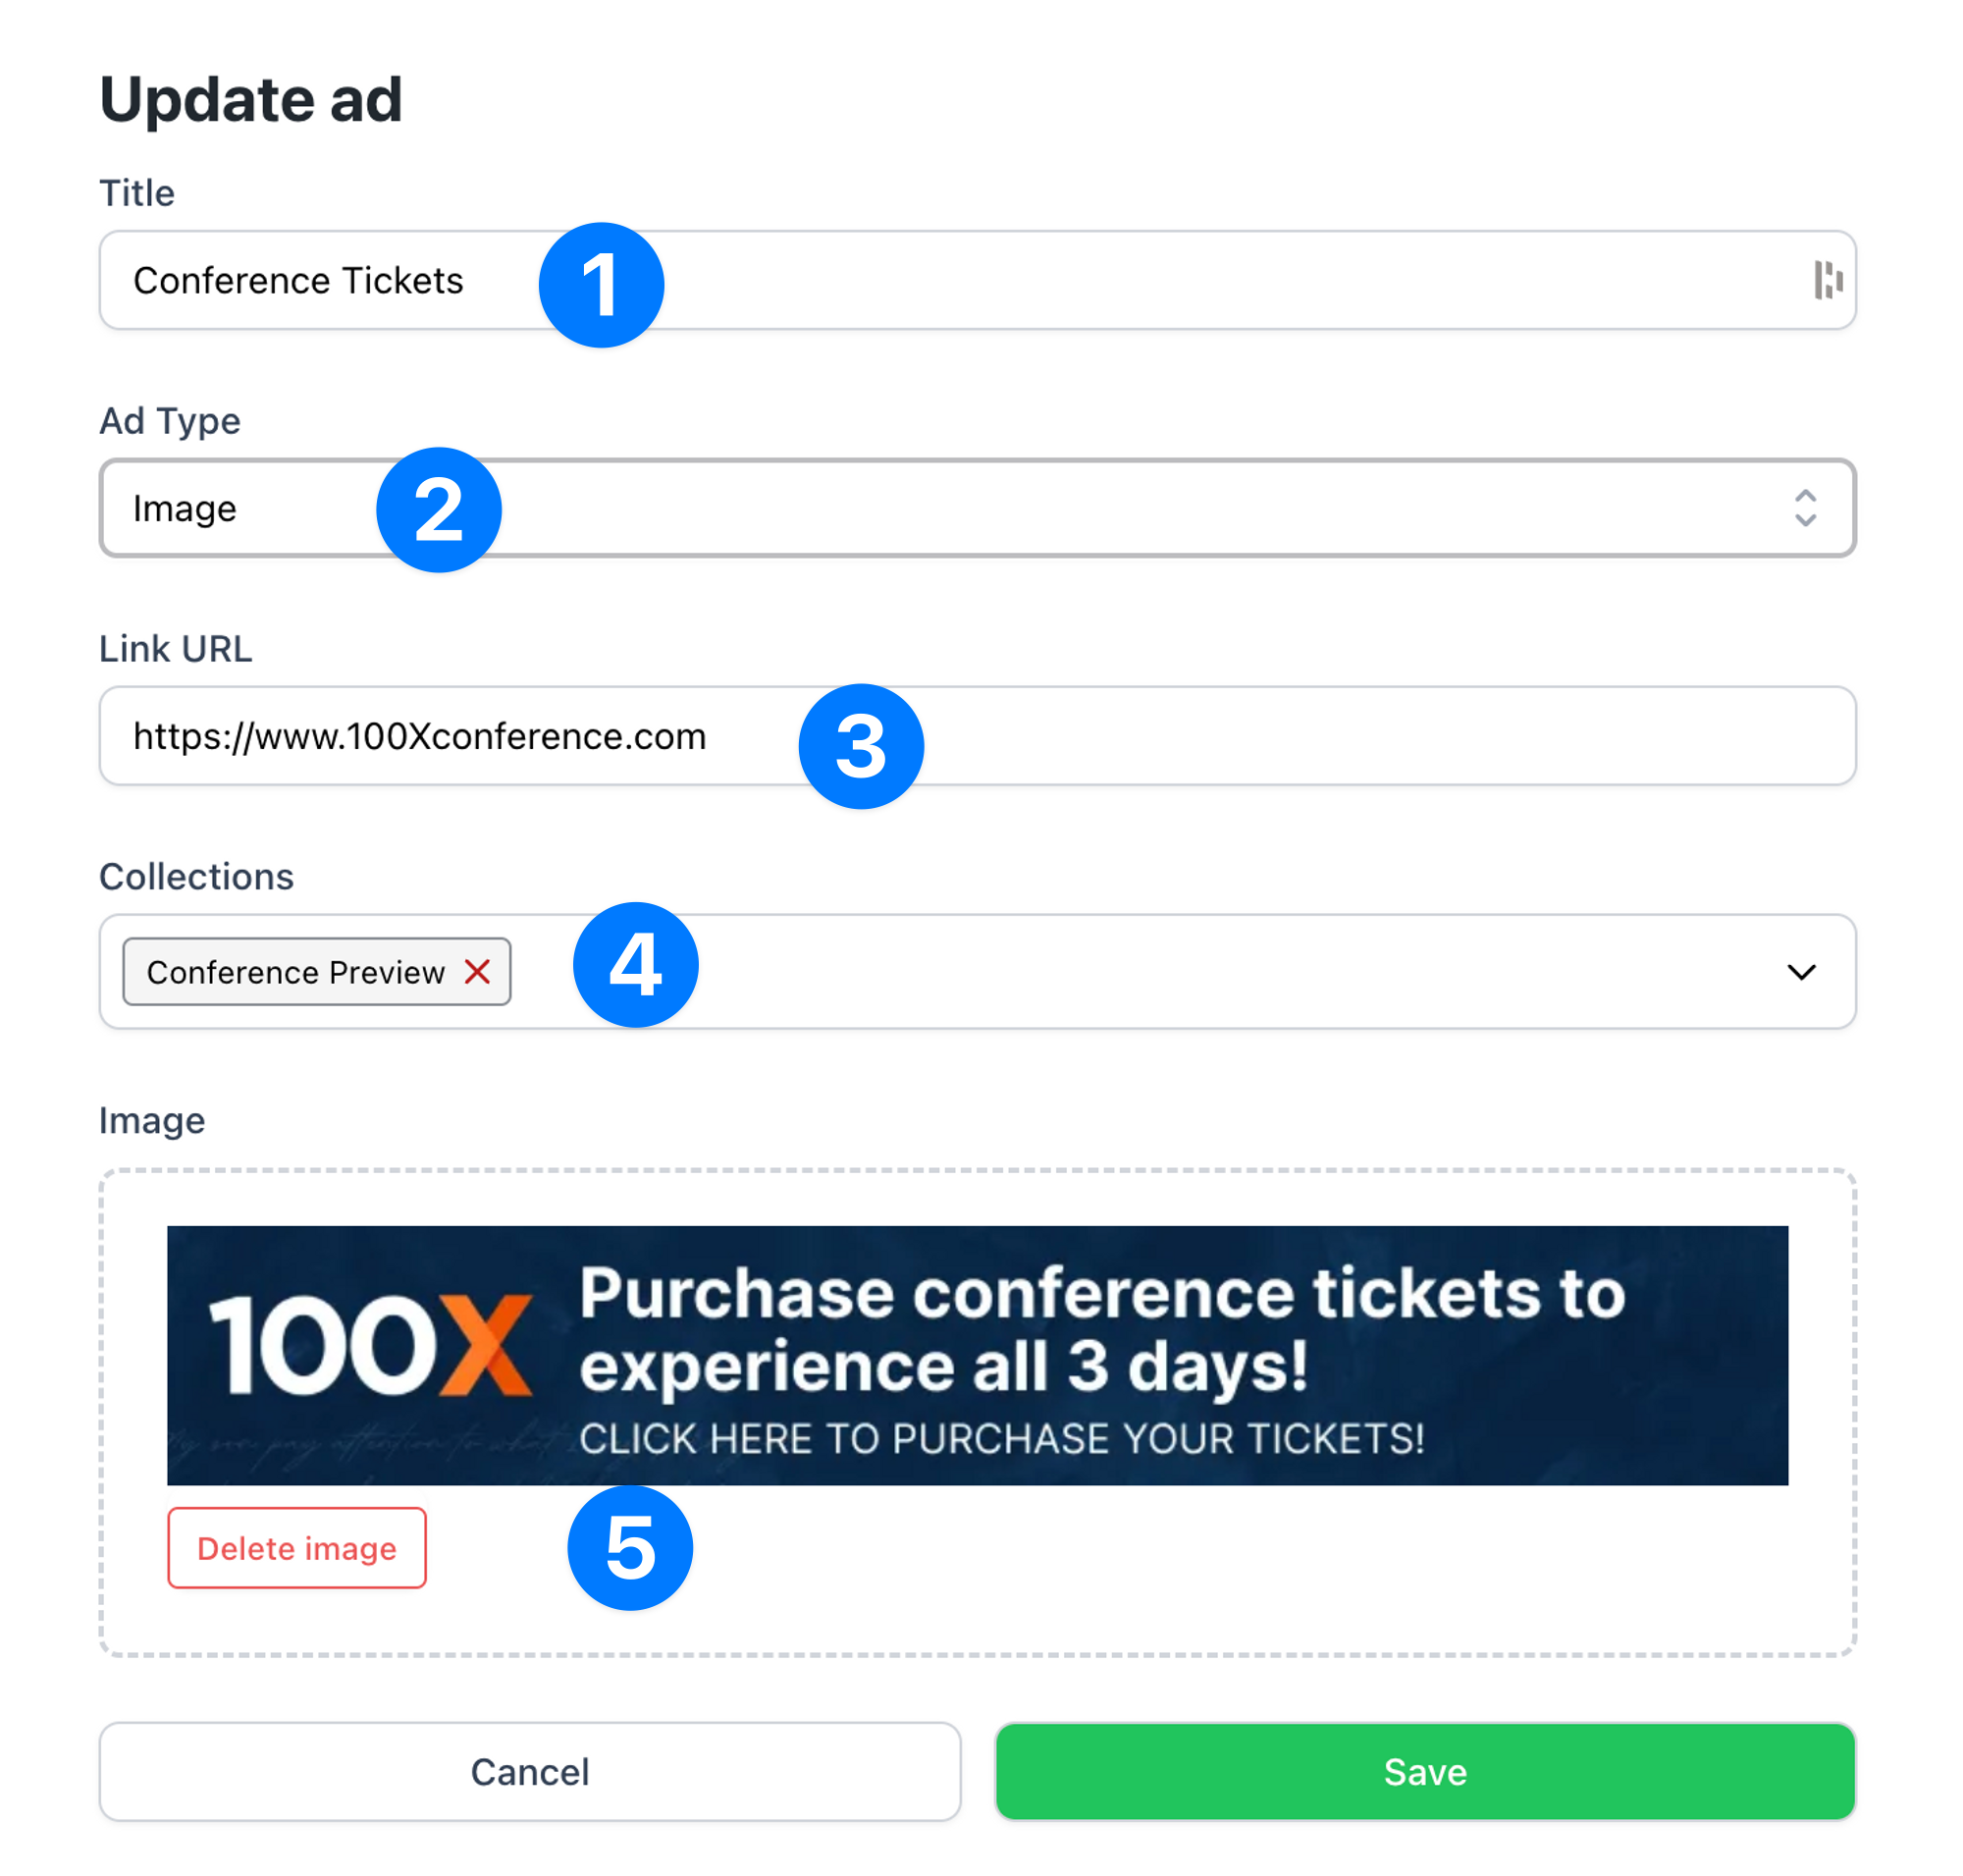
Create Ad/Ads
Create graphic in Canva/Figma with 800 X 128 dimensions
Set the Ad Title
Set the Ad Type
Add the link you want users routed to
Add to collection created in the first step
Upload the created image
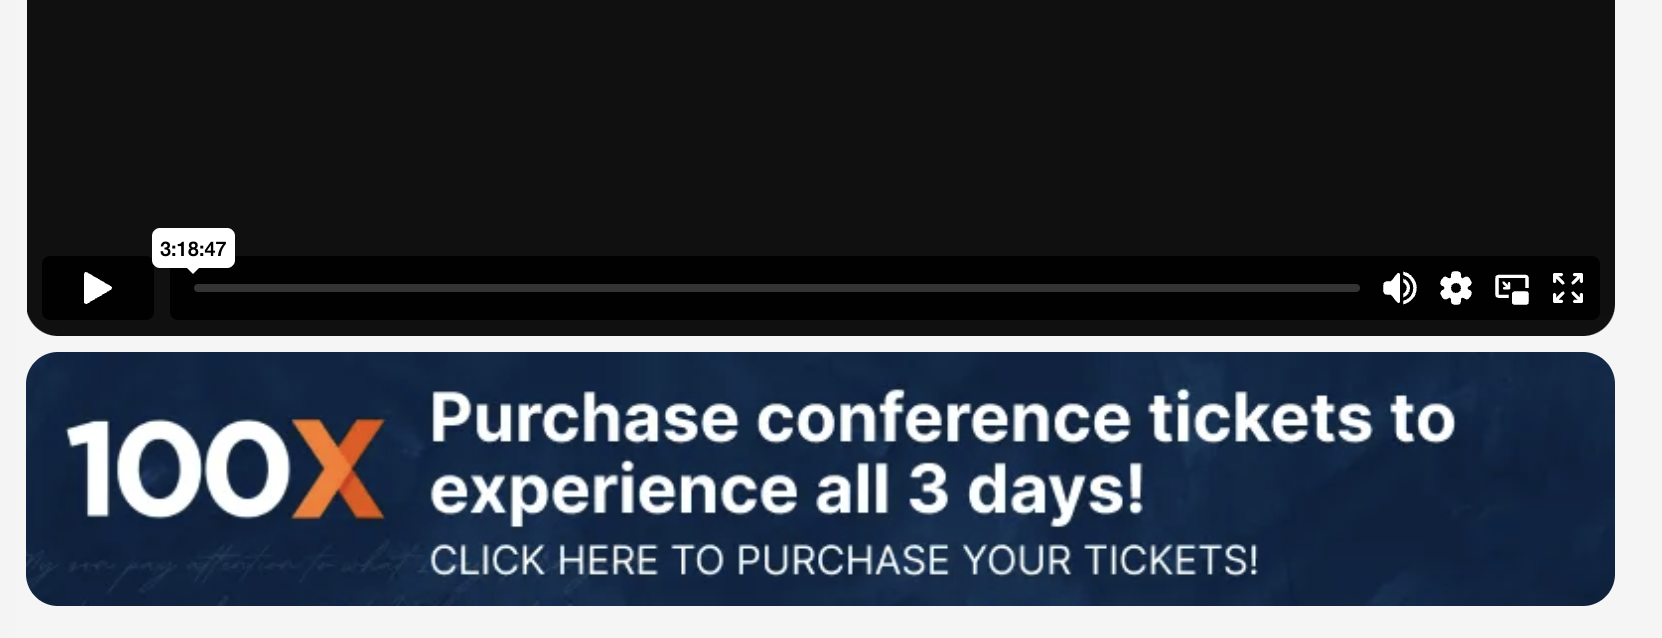
Your ad will then show up under the Tribe Web video (not your app website) and your viewers can click on it to be routed to the link you set:
Adding CTA Button in App
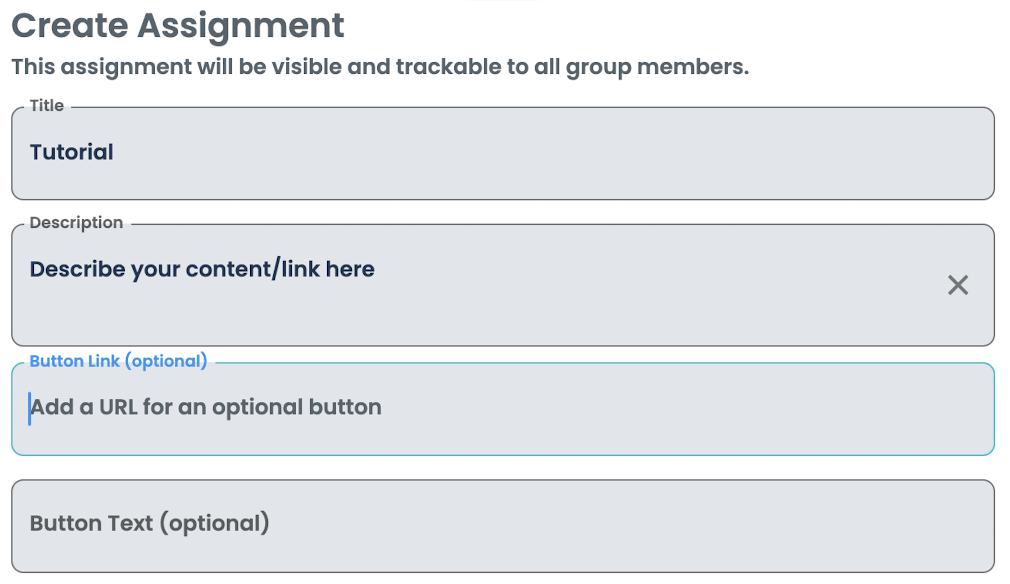
In the same “Create Content” box, you will add the test for your CTA button and the link you want it to lead to to appear in the app! Enable to “CTA Shareable” for the link load the user’s share menu rather than routing them to the URL. This feature can be a powerful tool for increasing engagement and participation in your live event.

This will appear in your app under the video like so:
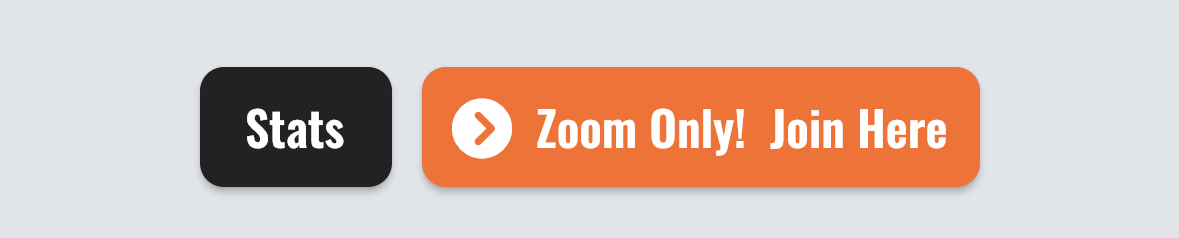
The CTA button included in your app can be customized to route to various links such as a live Zoom call, downloadable shared links, or any other relevant links that you want to direct your users to.
Adding Links or Downloads in App
Your customized app offers you the ability to add links to downloads or additional materials you want to share with your users through a check-in menu that is built into the app as well as allow users to track when they have completed these tasks.
This feature allows you to connect with your audience and share valuable content with them, increasing engagement and participation in your live events.
Encouraging Users to Share to Facebook?
To share your live event to Facebook, you will need to update the FB share link. To do this, go to https://developers.facebook.com/tools/debug and follow these steps:
1. Paste the web share link for your event in the "Input URL" field
2. Click on "Debug"
3. Once the page refreshes, click on "Scrape Again"
4. A preview of your shared link should appear. Check that the thumbnail, title, and description are correct. If not, you can edit them using the fields provided
5. Once you are satisfied with the preview, click on "Share" to post your live event on Facebook
Note that updating the FB share link is important because it ensures that the correct thumbnail, title, and description are displayed when your live event is shared on Facebook. This can help attract more viewers and increase engagement during your event.
By running live events through your customized app, you have the tools you need to create a seamless and engaging experience for your audience.
Didn't quite get the answer you were looking for? Shoot us a question or submit a ticket, here!